
We often find ourselves craving a robust cup of coffee reminiscent of what we might enjoy in a quaint Italian café.
One way to achieve this at home is through the use of a Moka Pot, which is a traditional Italian coffee maker designed to brew coffee by passing boiling water pressurized by steam through ground coffee.
Featured: If you’re looking for ground coffee specifically roasted for use in Moka pots, please check out our buyers guide: Best Coffee for Moka Pots.
It’s an elegant yet simple method that has stood the test of time, invented by an Italian engineer named Alfonso Bialetti in 1933.
The distinctive octagonal design isn’t only for aesthetics; it helps to diffuse heat perfectly to enhance the coffee’s flavor.
Our morning routine can be greatly enriched by mastering the Moka Pot, appreciated worldwide for its ability to produce coffee with a concentration that’s similar to espresso but without the need for complex machinery.
The process involves a few key steps: filling the lower chamber with water, adding coffee to the filter basket, and then assembling the pot before heating.
The pressurized water steams through the ground coffee, resulting in a rich and full-bodied brew.
Understanding the mechanics of a Moka Pot allows us to appreciate its capacity to brew coffee that strikes the balance between the potency of espresso and the gentler extraction of traditional drip coffee.
Over the years, the Bialetti brand has become synonymous with this brewing method. However, no matter the brand, these pots come in various sizes, catering to a single personal cup or enough to serve a small gathering.
With a little practice, we can easily turn our kitchen into the next best thing to an Italian coffee bar.
Understanding Moka Pots
In this section, we’ll explore the rich history of the Moka Pot, as well as the different types of materials they’re made from, highlighting features that have made this device a staple in Italian coffee culture.
History of Moka Pots
The Moka Pot, an iconic Italian coffee maker, was invented by Alfonso Bialetti in 1933.
This innovative design, shaped like a classic hourglass and easily recognizable with its distinctive eight-sided form, brought espresso to the home kitchen.
It operates on a simple yet ingenious method of brewing by passing boiling water pressurized by steam through ground coffee.
Bialetti’s invention became a symbol of “made in Italy” and revolutionized the way individuals enjoyed coffee daily.
Types of Materials
Moka Pots are predominantly made from two types of materials: aluminum and stainless steel.
- Aluminum: This material is lightweight, conducts heat efficiently, and is typically less costly. However, it requires careful handling to prevent corrosion and is not suitable for dishwashers. Aluminum pots are traditional and offer a classic aesthetic that many associate with the authentic Moka Pot experience.
- Stainless Steel: Often chosen for its durability and sleek appearance, stainless steel Moka Pots are resistant to rust and are dishwasher safe. Though they may have a higher price point, pots made from stainless steel can offer a more neutral flavor and are known for their long-lasting quality.
Both materials have their advocates and can produce a robust Italian coffee when used properly. The choice between aluminium or stainless steel often comes down to personal preferences in maintenance, taste, and budget.
Selecting Coffee and Grind
When we brew coffee with a moka pot, the choice of coffee beans and grind size is crucial to achieving a perfect cup. Let’s focus on how to select the best beans and grind them to the right consistency.

Choosing the Right Coffee Beans
For a moka pot, we often prefer a medium to dark roast, as these roasts highlight rich, chocolaty flavors that stand up well to the moka pot’s brewing method.
It’s important we select high-quality beans to ensure the coffee’s flavor is robust and full-bodied. Experimenting with different origins can also offer us a variety of flavor profiles, from nutty and smooth to fruity and bright.
Grind Size and Consistency
The grind size for a moka pot should be a fine grind, slightly coarser than espresso but finer than what we’d use for drip coffee.
We aim for a consistency similar to that of table salt. Using a burr grinder is ideal because it provides uniform grind particles, which is essential for even extraction.
If we opt for pre-ground coffee, it should be packaged specifically for moka pots to ensure the right grind size.
Preparation Steps
Before brewing your first cup of coffee using a Moka pot, it’s crucial that we start with two key steps: correctly filling the boiler with water and precisely adding the coffee to the filter basket. These initial actions set the stage for a perfect extraction.
Filling the Boiler
Begin by selecting filtered water to fill the boiler component of our Moka pot. This ensures a pure flavor profile in our coffee and prevents any mineral build-up in the pot.
We bring the water to a boil separately before filling to reduce the Moka pot’s exposure to prolonged heat, which could affect the taste of our coffee.
- Heat the water in a kettle until it just reaches a boil.
- Carefully fill the boiler of the Moka pot with the hot water up to the fill line, making sure not to exceed it. This line is typically located below the safety valve—an essential detail to prevent overfilling.
Adding Coffee to Filter Basket
For the optimal brew, the grind of the coffee grounds is key. We aim for a grind that is slightly coarser than an espresso grind but not as coarse as we’d use for a drip filter.
This texture ensures we don’t over-extract the coffee or clog the filter.
- Measure out enough coffee to fill the filter basket. We’re looking for an even, leveled fill—no need to tamp the grounds as we might with an espresso machine.
- Once filled, we carefully wipe away any excess grounds from the edge of the basket to ensure a snug fit in the boiler, which prevents any escape of pressurized steam during brewing.
By correctly filling the boiler and adding coffee to the filter basket, we’re setting ourselves up for a robust and aromatic brew from our Moka pot.
Assembling Your Moka Pot
When we put together our Moka Pot, ensuring a proper seal and acknowledging the safety features are paramount for a successful brew.
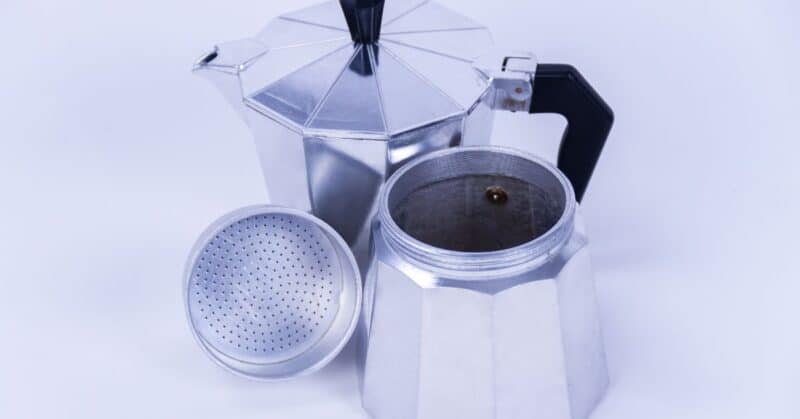
Sealing the Components
To begin, we take the bottom chamber of the Moka Pot and fill it with water up to the safety valve—this acts as a crucial indicator for water levels.
A rubber gasket is then placed inside the upper chamber’s base; this creates the necessary seal to prevent steam from escaping improperly.
We must ensure that the gasket is correctly seated and free from any damage or debris.
We then fill the filter basket with coffee grounds and level it off without pressing down too hard, as this can impede the water’s flow. The basket is nestled into the bottom chamber.
Our next step is to attach the upper chamber to the base by threading it gently to avoid cross-threading which can compromise the seal.
Safety Features
Every Moka Pot is equipped with a safety valve that is critical to our safety when brewing. This valve prevents excessive pressure build-up within the Moka Pot.
During assembly, we need to ensure that this valve is clean and not obstructed. We do not fill the water above the valve as it serves as an emergency escape for pressure.
In case of a clog in the funnel, this valve helps to avert potential hazards. We must always check the integrity of the safety valve before every use to maintain safe operation.
Brewing Your Coffee
In using a Moka pot, also known as a stovetop espresso maker, we focus on two critical steps: heating the pot and monitoring the brew process. This ensures a perfectly brewed coffee every time.
Heating the Pot
We begin by filling the lower chamber of the pot with hot water up to the valve to expedite the brewing process.
It’s crucial to use medium heat on our stove to prevent the coffee from tasting burnt.
The goal here is to reach the optimal brewing temperature without rushing the process.
- Fill the chamber with hot water just below the safety valve.
- Place the Moka pot on the stove on medium heat.
Monitoring the Brew Process
Attention to detail is key during the coffee brewing process.
We listen for a hissing sound, which indicates that the water has filtered through the coffee grounds and the brew is complete.
Ensuring that we remove the pot from the stove immediately after the brewing prevents a bitter taste.
- Observe the coffee as it starts to fill the upper chamber.
- Once the hissing starts, promptly remove the pot from the heat.
Serving Suggestions
Once we’ve mastered brewing with our moka pot, we can indulge in a variety of espresso-based beverages or adjust the brew to suit our strength preference.
It’s about finding the right balance to create the perfect cup that resonates with our taste.
Espresso-Based Drinks
For those of us who savor the richness of espresso, using a moka pot can produce an espresso-like coffee strong enough to serve as a base for various drinks.
A latte requires us to add steamed milk to our freshly brewed moka pot coffee, typically in a ratio of one-third coffee to two-thirds milk.

To enjoy a traditional cappuccino, we’ll combine equal parts of moka pot coffee, steamed milk, and milk foam.
For an americano, simply dilute our moka pot concentrated coffee with hot water – a good rule of thumb is equal parts coffee and water.
Adjusting the Strength
We can adjust the strength of our coffee by tweaking the water-to-coffee ratio.
For a stronger brew, reminiscent of a double shot of espresso, we might use a little less water or a bit more coffee. If we prefer a less intense cup, we can increase the water or decrease the coffee slightly.
It’s crucial to experiment with these ratios to discover what best suits our palate for that perfect, robust moka pot coffee.
Cleaning the Moka Pot
To ensure our Moka Pot continues to brew the finest coffee, it is essential to regularly clean it.
By maintaining its cleanliness, we prevent coffee residue and oils from impairing the taste and function of the pot.
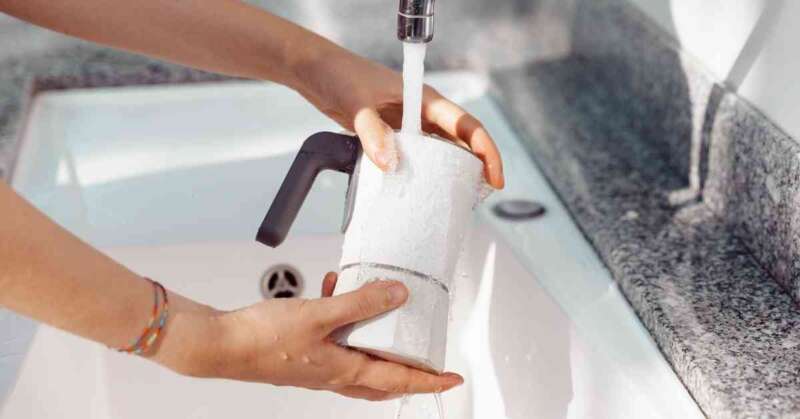
Daily Cleaning
After each use, we perform a routine cleaning to keep our Moka Pot in perfect brewing condition. Here’s how we do it:
- Disassemble: Once the pot is cool to the touch, we separate all the components.
- Rinse: We thoroughly rinse each part with hot water to remove coffee grounds and oils.
- Mild Soap: If needed, we use a mild soap to gently clean the parts—ensuring that no soap residue remains after cleaning.
- Dry: To prevent moisture buildup, we carefully dry each piece with a towel or let it air dry before reassembling the pot.
Deep Cleaning Tips
Occasionally, our Moka Pot requires a deeper clean to tackle any stubborn buildup. Here’s our approach to deep cleaning:
- Vinegar Solution: We mix equal parts water and vinegar and brew it in the Moka Pot as if making coffee. This helps in descaling and removing any mineral buildup.
- Avoid Harsh Detergents: To protect the pot’s material and integrity, we steer clear of harsh detergents and abrasive sponges.
- Soft Brushes: We use soft brushes or cloths to work away any coffee residue that might cling to the pot without scratching the surface.
- Rinse Thoroughly: It’s crucial to rinse all components multiple times after a deep clean to ensure no cleaning solution remains.
By following these guidelines, we preserve the life span of our Moka Pot and the quality of coffee it produces.
Troubleshooting Common Issues
When using a moka pot, we may encounter a range of issues that can affect the pressure, steam, and ultimately the flavor of our coffee. Here’s how to address some of the most common problems.
Pressure and Steam Problems
Leaking or No Pressure Buildup: If your moka pot is leaking or failing to build up pressure, inspect the seal.
A worn or damaged seal can cause leaks, preventing the build-up of steam pressure that’s essential for brewing.
Replacing the rubber gasket and ensuring the filter plate is clean and correctly placed can resolve this issue.
Safety Valve Releasing Steam: It’s alarming when the safety valve releases steam.
It’s often due to overfilling the water chamber or using too fine a grind which clogs the filter.
To fix this, fill the water just below the valve and use a grind that’s slightly coarser than what one would use for espresso.
Taste and Quality Concerns
Weak Flavor: A weak or under-extracted flavor often indicates that water is passing through the grounds too quickly.
Use a finer grind or apply a lighter tamp to the coffee grounds. This adjustment will increase resistance and improve flavor extraction.
Metallic or Off Taste: If the coffee has a metallic taste, it could be due to the moka pot needing a thorough cleaning, or it might be an indication that the coffee grounds are in contact with the upper section of the pot due to overfilling the basket.
Regularly clean all parts with warm water, and don’t overfill the grounds basket.
By methodically addressing these issues, we can ensure our moka pot continues to produce flavorful and aromatic coffee with each use.
Optimizing Your Experience
We all strive for that perfect cup of coffee, and when it comes to using a moka pot, achieving that rich, full-bodied flavor with a smooth consistency is a rewarding endeavor.
But let’s not forget, regular maintenance and care of our equipment is just as crucial to ensure every brew is a delight.
Achieving the Perfect Brew
To start, we must always grind our fresh coffee beans finely to medium-fine; this range promotes optimal extraction of oils and flavors during brewing.
It’s important to add cold water to the lower chamber up to the safety valve—never over it.
When adding coffee to the filter, we avoid tamping down too hard; a light press is sufficient to maintain the necessary airflow.
- Steps for the Perfect Brew:
- Fill bottom chamber with cold water below safety valve.
- Add ground coffee (fine to medium-fine) to the filter basket.
- Assemble the moka pot firmly to create a good seal.
- Place on medium heat and remove from the burner just as coffee finishes bubbling out.
Following these steps ensures a consistent brewing pressure and temperature, key to a perfect cup of coffee.
Maintenance and Care
We must clean our moka pot after each use, not allowing the coffee oils to build up and affect the taste negatively.
Washing with warm water and drying thoroughly will suffice; we avoid using soap which can strip away the oils that contribute to the moka pot’s unique flavor profile.
Regular checks are important, too. We ensure the safety valve is clean and that the gasket and filter are free from debris:
- Daily Maintenance Tips:
- Rinse with warm water after every use.
- Check the safety valve for any clogs.
- Periodic Care Recommendations:
- Replace gaskets and filters as necessary.
- Occasionally, brew a mixture of water and vinegar to remove any mineral buildup.
By adhering to these maintenance and care guidelines, we help our moka pot last longer, providing us consistently delightful experiences.
Frequently Asked Questions
In this section, we address some of the most common inquiries about using a Moka pot, from brewing technique to comparing its coffee with traditional espresso.
What is the proper technique for brewing coffee with a Moka pot?
To achieve the best flavor when using a Moka pot, it is vital to grind coffee to a fineness akin to table salt. Fill the basket evenly without overpacking and ensure the water is below the safety valve.
How much time is required for a Moka pot to complete the brewing process?
The brewing time for a Moka pot typically ranges between 5 to 10 minutes. Once you hear a hissing, bubbling sound, it’s an indicator that the coffee has finished brewing.
Should I begin the brewing process in a Moka pot with hot or cold water?
Starting with hot water in a Moka pot can expedite the brewing process and reduce the risk of over-extracting the coffee, which may lead to bitterness.
Is it necessary to fill a Moka pot to the top with coffee grounds for optimal results?
We recommend filling the Moka pot’s basket to the top with grounds and leveling it off without tamping, as overfilling or tamping can cause over-extraction or block the pot.
Can a Moka pot be used on an induction cooktop?
A traditional Moka pot is not suitable for an induction cooktop as it is typically made of aluminum. However, there are stainless steel Moka pots designed for usage on induction cooktops.
How does the coffee produced by a Moka pot compare to traditional espresso?
While a Moka pot does not create the same level of pressure as an espresso machine, the coffee it brews is strong and flavorful, producing a concentration that is similar to that of true espresso, although not quite as intense.